Magrider Guide by Quovatis
Since I feel that I'm one of the more experienced Magrider drivers in planetside, this guide is meant to help others out.
-Quovatis
Magrider Properties
I consider the Magrider to be the best tank in planetside. While the Prowler and Vanguard are better in specific situations, the Magrider is the most versatile. Your Magrider has a driver weapon, the Pulsed-Particle Accelerator (PPA). This weapon is mainly an anti-infantry weapon, but it can also turn the battle in your favor versus enemy armor. The gunner weapon is the railbeam. Unlike other tanks, this weapon has no arc and travels very fast. It has limited splash damage, and takes three hits to kill a rexo. The Magrider is also unique in that it is the only tank that can travel over water. This is a big advantage.
Driver Setup
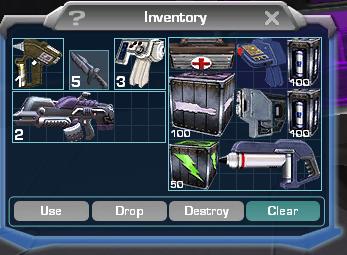
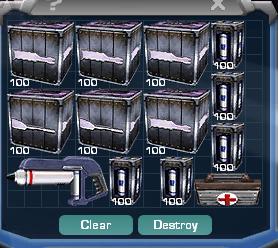
When you acquire your Magrider you should have a favorite with 4 boxes of PPA and 2 boxes of Rail Beam ammo. This should be your normal loadout, as the PPA goes through ammo quickly. However, if you plan on doing a lot of water driving or long range sniping, you should get 3 or 4 boxes of Rail Beam, as you won't be using the PPA much. Your favorite should also have a spare glue gun, 5 boxes of glue, and perhaps a medpack. This allows you to carry less glue in your infantry loadout, saving space for other things...
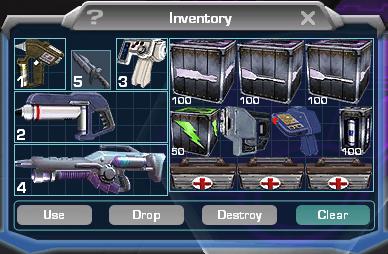
If you do a lot of tank driving, you should have a favorite with a box of PPA ammo, a glue gun, a pulsar, glue, a REK (sometimes you might need to take a tower), and whatever else you can get in there. I prefer the Pulsar to the Lasher because you can hot swap with the glue gun directly and it saves space. The Pulsar also provides medium-range fire that the lasher cannot provide if you come under attack while repairing. Have the pulsar in the rifle slot just in case you come across an enemy going to the vehicle pad. If you are CR3 or higher, take a CUD along for clearing minefields or OSing that noob stationary BFR you come across.
The implants I recommend are Enhanced Targeting, Darklight, and Audio Amplifier. Always have Audio Amp on, and Darklight lets you run over those pesky cloakers.
Driver Tactics
Before I go any further, let me say that if your gunner is not on voice comms with you, you're only operating at 50% efficiency. A good driver is worthless if your gunner can't help you out. Your gunner needs to be able to convey threats to you and give you more situational awareness.
Your goal while driving is to keep the tank alive. Certain situations dictate that you might need to sacrifice yourself to kill your target, but you need to have the discipline to know when to disengage to avoid death, even though your target just needs 1 or 2 more hits to kill. Getting kills comes naturally, but only if you can keep the tank alive. Disengaging and quickly repairing will yield more kills over time than killing that one tank while getting killed yourself, then pulling a new tank.
Your secondary goal is to get kills, or more specifically drive such that your gunner can get kills. The main advantage of the magrider is its long range weapon. You want to keep as much distance between you and your target as possible. Your gunner should let you know if the target is out of range. Find a target. Stay at maximum range and stationary to engage if not under fire. If you are on water, you can move as much as you like, as long as you stay in range.
- Roads: Avoid roads if at all possible. Always assume the roads are filled with mines. If you must drive on the road, drive as far to the side as possible.
- Water: Water is your friend. Drive on water whenever possible. If you hug the shoreline, your speed will not decrease. The main benefit of water is that it provides a stable surface for your gunner. Driving in long circles out in the middle of the water allows your gunner to hit almost anything with pinpoint accuracy, while dodging almost all enemy fire. I've literally done this for 5 minutes with multiple enemies trying to kill us.
- Hills: Avoid when you can, as it is very hard for the gunner to hit anything. However, sometimes getting on top of a hill overlooking a base can yield many kills. If you strafe while going up a hill, you get more torque out of the tank, so keep that in mind.
- Trees: Trees are the friend of an experienced Magrider driver, but can be deadly for the inexperienced. Your tank is not as wide as the other tanks, and you can slip through the trees and run away easily. Inexperienced drivers will get stuck in the trees, leading to death many times.
You should be glancing at your mini-map (radar) every second or 2. You need to watch out for Liberators lining you up all the time. Fixating on a target for 5 seconds is enough time for bombs to come out of nowhere and kill you. Pay attention at all times. The minimap also lets you see potential targets. The Mosquito's overflight radar data is transmitted to you as well, letting you see targets you might not otherwise. Motion detectors also give you information, but you will miss it if you don't constantly look at your radar. It also lets you see how the tank your gunner is engaging moves, allowing you to determine which way you need to turn to follow or run.
Remember you have a weapon too. Many times you will get killed if you don't use it, but other times you might get too fixated on a target and not pay attention to driving and keeping you alive (your main goal). Lone infantry are perfect prey for the PPA. Hit them a few times with the PPA, then run over them. Always be aware for traps, however. Trying to run over infantry sometimes leads you straight into a minefield. If you find a minefield, stop as soon as possible. Reverse course, and go as you came.
Repair whenever possible. If you are less than half health, you need to repair immediately unless you are in a 1 vs 1 battle and you think you can finish them. Even if you are only slightly damaged, repair if you are not under fire, as that extra health might save you in just a few seconds. Usually you want to go away from the battle to repair, but if you're on a good hill or at long range, you can turn your tank to block fire, and repair yourself in battle. While you are out, your gunner is actually more accurate, as the tank will not be bouncing up and down as normal. When repairing, your gunner should do a quick darklight sweep to look for cloakers. If it's clear and you don't expect enemies, the gunner should help you repair. You should almost require your gunner have a glue gun, or else you will spend a lot of time repairing yourself, which is a waste of time. If you have Amp Station benefit, try to repair inside a friendly SOI to build shields while you repair. If you have Dropship Center benefit, get ammo and let your gunner repair you at the repair silo if it's clear.
If you drive conservatively, you can live for hours with the same tank, and get 100+ assists easily. Too many tank drivers I gun for drive straight into the battle, and never repair.
Target-Specific Tactics
- Aircraft: Reavers are the main threat here, but all aircraft are treated the same. You have two choices: try to kill it, or drag him by friendlies. If you chose to kill it, find water and drive in circles. You gunner should hopefully be able to kill him easily. If you can't find water, find a relatively flat spot of ground, and strafe slowly in one direction. This lets your gunner have a stable platform and you might dodge a few missiles. If there are no flat spots around, if you are badly damaged, or if the aircraft is smart and flies almost directly overhead, head for the trees and friendlies.
- Lightnings: Not much of a threat. Usually you can just snipe them at long range, or head straight in for the kill. If there are lots of them, keep moving to avoid fire. Use the PPA for even quicker kills.
- Fury: One of your biggest threats. Second only to the reaver, you should kill these first. The rockets from the Fury do massive damage. Lure them to open ground where you can kill them easily.
- Flight Variant BFRs: These BFRs have the same top speed as a Mag while in run mode. Get out on water and run in circles. Disengage if you get badly hurt. You can win 1 on 1 with a flight variant if you drive well, but engage cautiously. If anything else starts shooting at you, break away.
- Sunderer Variants (Vindicator, Juggernaut, and Leviathan): Though all very similar in firepower, the Vindicator has a slight edge because of the high damage of the 20mm and the projectile veolocity, but you can treat all variants the same. The biggest threat these vehicles pose is their EMP blast. Stay as far away as possible to engage, so you stay out of the blast range. Zig-zag to avoid the 75mm fire, as this is the majority of their firepower. The profile is so big that it's hard to miss them at any range, so don't be shy about staying far away. If you come on one them by surprise another tactic you can use is to stay as close as possible to them. You will stay below their gun arc (unless they have a ballgunner, but it doesn't do much damage) and will be relatively safe. However, you are prone to EMP blasts and the splash from your own railbeam weapon, so only use this tactic if you are isolated from heavy fighting or know that they already used their EMP.
- One-Manned Field Turrets: All OMFTs are similar and suffer from damage degredation. Get too close and you will be shredded up. The range of the turrets is 250m, so you have 50m more range to use to your advantage. Avoid close encounters unless you are at full health, and finish them off if you get the chance, as their shields recharge and you don't want to waste your efforts.
- New Conglomerate
- Vanguard: Probably the easiest enemy tank to kill. While they have the most armor, and heaviest hitting gun, they lack mobility and rate of fire. However, if you engage at close range, you will likely die. Engage at medium-long range and move to avoid fire. If you must engage at close range, use the PPA and weave through trees. If you can't get the first 3 or 4 rail beam shots on him before he notices you, you probably need to disengage. If one is following you, head for water, or trees. Vanguards have a really tough time in trees. When they get stuck in the trees, circle back and finish them off.
- Thunderer: I fear this vehicle the most of any enemy vehicle. It has direct fire weapons, meaning that most of your normal tactics don't work. Running for water might not be the best choice when facing thunderers because if they follow you into the water, only half of their surface area is hittable, while you are no different. Keep as far away from thunderers as possible, where you still can dodge their slow projectiles. If you find dueling one at close range, you MUST engage with the PPA. It is the ONLY way you will win, as the Thunderer with two gunners has a faster time to kill on a Magrider, than the Rail Beam alone can match.
- Enforcer: Usually not much of a threat, unless they are in packs. They are fast, however, which makes killing them a little tricky.
- Phoenix: While the Phoenix has a slow rate of fire, when it does hit, it hurts. Avoid hills where Phoenix users can hide. If there is just one, close and kill. Watch your minimap for the direction. The main limitation is its range. When running from Phoenixes, run in a straight line away from the user. Hopefully the fuse will burn out before it gets to you. Sometimes weaving in trees can scrape off inexperienced Phoenix users.
- Peregrine: If it has the particle cannon as the gunner weapon (which almost all of them do), avoid at all costs. The particle cannon can kill you very quickly and is very accurate. Don't fire upon it to let them know you are there, and only fire on it if it's hurting or others are helping you. The shield regeneration rate of a crouched BFR is only slightly less than the damage the rail beam can deliver. You will be shooting at it a very long time if you think you will kill it alone.
- Terran Republic
- Prowler: This is your biggest enemy tank threat. At close range, the Prowler will kill you in the blink of an eye, especially with 2 gunners. Use the same tactics as the Vanguard above. Stay as far away as possible and lure them into trees or head for water.
- Raider: While not as deadly as the Thunderer, at point blank range, you will still have a hard time winning. Keep as far away as possible, where the damage of the raider is less. Like the tactics for the Thunderer, water might not always be the right choice.
- Marauder: Very little threat unless you are heavily damaged. Pursue and destroy, but watch for their heavy hitting brothers. This vehicle can carry 3 striker-equipped troops. They pose a bigger threat when the bail and Striker you. Kill them before they can bail.
- Striker: A lone striker is no threat, but it seems like just about every TR player has one. If you get locked on, head for obstacles to break the lock. Even if you do break the lock, you need to change direction, since the rocket can sill hit you if you don't.
- Colossus: Not as bad as the Peregrine, but still just as hard to kill. Treat like a Prowler to avoid fire.
- Vanu Sovereignty
- Magrider: Rarely encountered, but a big threat. Head for trees, where you will likely make the less experienced magrider driver get hung up.
- Aurora: Laugh at them after you kill them. Not a big threat.
- Thresher: Keep moving to avoid fire. Treat like an Enforcer.
- Lancer: Not much you can do to avoid fire. Find cover and try to get out of range, though the range is huge. Trees might help.
- Aphelion: If you ever find one of these, it's rare. They have decent anti-vehicular armorment, so it's best to stay away. It's harder to dodge hits, since the fire is direct fire.
Gunner Guide
As stated before, ideally you need to be on voice comms with your driver. You don't have time to type "I see a vanguard on the other hill, steady me for a second". If you know you will be gunning, your loadout should carry two boxes of rail beam ammo and one box of PPA. You should have a glue gun, and a Lasher if you have it certed, though a Pulsar is fine too. You don't need to carry more than 1 or two boxes of repair juice, since hopefully your driver has plenty in the trunk if you run out. Recommended implants are Enhanced Targeting and Darklight. The third slot is up to you, but Audio Amplifier is probably best.
Like driving, the gunner needs to be looking at the radar screen every few seconds. It might alert you of that cloaker that is right next to you or a liberator lining you up. If you see puffs of green smoke ahead, that's likely an enemy cloaker laying mines down. Anticipate where he is and shoot him. Don't fixate too much on any given target. While you're firing at that Prowler a mile away, your driver might have just run into a Thunderer at point blank range and needs your help pronto.
Your main goal while gunning is to defend the tank. Your secondary goal is to attack targets. Thus if you are chasing a Vanguard but a Reaver is killing you, you need to direct fire at the Reaver first.
You should always target the least armored and most heavily armed targets first. A rough order of threats that you should engage when on the defense:
- Reaver: Probably your biggest threat, so they should always be priority if you know they see you.
- Fury: Very damaging weapon, but relatively easy to kill. Kill first.
- AV MAX units: Falcon is not much a threat, but if a Pounder if firing at you, it should be second only to the reaver, as they can kill you very quickly.
- Nearby Anti-Vehicular Troops: If you have a good line of sight on them, target them before enemy tanks. But if they are hiding behind trees or cover, ignore.
- Tanks: Low on the list, but they have high firepower if they are nearby.
- Thunderer and Raider: Low armor, but high damage output. As stated earlier, we want to avoid contact at close range, but if you do, these should be second only to the reaver.
- Assault Buggies: Not much of a threat, so these should be a very low priority when under fire.
- Sunderer Variants: Moderate threat, but takes a long time to take down. Engage if it's the only threat, but ignore if there are deadlier enemies out there.
- Mosquito Usually not much of a threat, but likely a quick take-down.
- BFRs: Lowest of all, since you almost ask for death if you start shooting them. If they are hurt or others are engaging with you, take them out.
On the attack, you should be targeting AMSes, tanks, and MAX units in that order as priority, though it's never bad to work in a quick infantry kill when possible.
When your driver stops to repair, do a quick darklight sweep of the area to check for cloakers, especially near Lodestars. After that, you need to make a judgment to either help repair, or stay in the gun. Only experience will help you make the decision.
The most important job of the gunner is to communicate the surroundings to the driver, which is best done through voice comms. If you are pursuing a target, the driver usually knows the situation quite well, though if something starts attacking you from behind, you need to start talking to the driver. If something is following you, YOU need to become the commander of the tank. If the target following you is hurting badly, and you're a little better off, but the target stops following you, you need to make a decision. One choice would be to tell the driver to turn around and finish him off, though if you think it's too big a risk, tell him to keep running. The driver can't see behind you, so you need to tell him what's happening. When on the attack, you need to talk as well. You should be saying things like "steady me for a second", "no shot, move left a little", "target is out of range", "target is down, we're clear", or "get us out of here". Without the driver having this information, you're only running at 50% efficiency.
A good driver and gunner can easily play for 3 hours and have a 50 to 1 kill to death ratio. You will get killed, there is no avoiding it, but by following this guide, you will have already made your mark...for quite a long time hopefully.
New CE Addendum
With the addition of the new Combat Engineering, several new tactics can be introduced. The main change for tank drivers is the use of the Aegis Shield Generator. By having an FDU either in you or your gunner's inventory, or in your mag's trunk, you can make a cloaked repair station. When you get out to repair, place an Aegis down beside you. This will cloak you while you repair. If you plan on coming back to the same spot for a while, you might consider charging the shield up to provide even more cover. Note, however, that charging the shield takes a signigicant amount of "glue", time, and the FDU takes up a lot of room to store. Thus, be sure you still have enough glue to repair the mag itself, as you cannot get more from the Aegis. Usually it's not worth the time to charge the shield, but the cloaking effect is well worth it.
Cerberus Turrets are also a nice addition for tank drivers. Place 1 or 2 of these at your repair site to scare away enemy air cav. You can also set up many more in a single area and use it as a retreating point to scare off that Reaver that is chasing you.
The new Anti-Vehicular Wall Turret can make quick work of a mag. The damage per second is roughly equivalent to the Prowler! These upgraded turrets should be taken out whenever possible. Treat like a Colossus: stay far away and strafe to avoid fire and engage with the long range of the rail beam.
TRAPs are usually not a great concern to a Magrider. You usually see them on bridges, but Mags can easily avoid bridges. Be aware that you can drive stright through a friendly TRAP as if it were not there.